INVENTA

Inventa wildlife monitoring

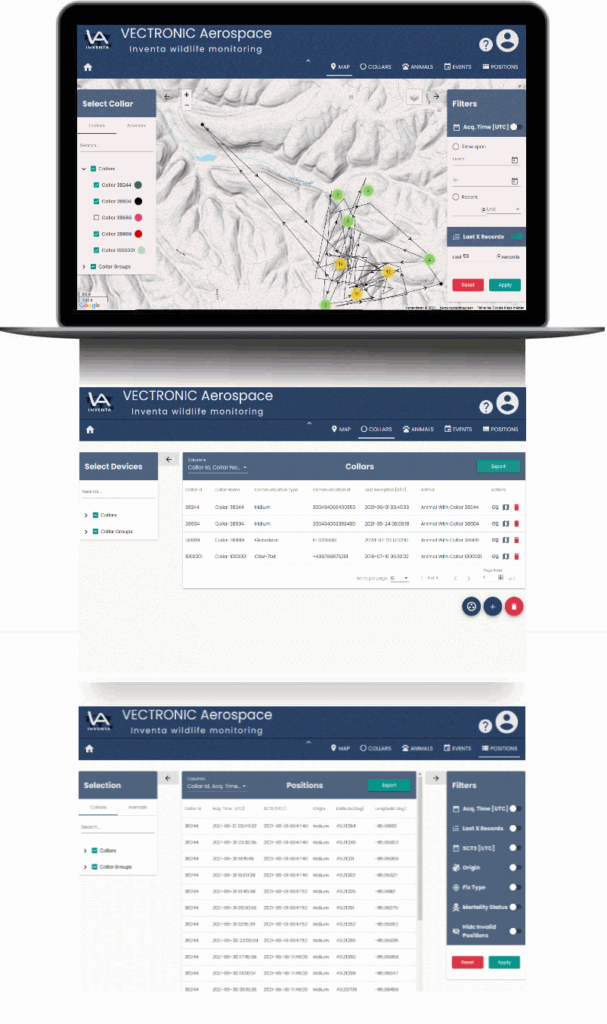
INVENTA wildlife monitoring is a webservice to display and manage your collar data.

You can:


  • Register your collars and view its data
  • Generate animals / groups and assign them to the collars
  • View the collar’s positions on a map
  • Apply filters and customize the overall map appearance
  • Download and export your data
  • Share your collar data with your colleagues


Add a collar

To add a Collar please switch to the Collar page at first.

Then click on the “+ Import collars” button on the right side of the screen.

A dialog opens where you click on “ Select Collar Keys”.

The checkbox “Create Animal for each collar” creates an animal for each created collar and defines a deployment starting with the current date.

After you have selected the collar keys you want to upload, they will appear in a list which you can check again before you click on “ Import Collars“.

Assign a collar to an animal

There are several ways to assign a collar to an animal.


Option 1: Assign a collar to an animal automatically while uploading the collar key.

While uploading your Collar keys you have the possibility to activate the checkbox “Create animals for each collar”.

In this case, for each collar key you upload, an animal will be created and assigned to the corresponding collar.

The name of the animal will set as “Animal with Collar xxxxx” and in the comment field of the animal will be written “Autogenerated Animal”.


Option 2: Select a collar on the collar page or an animal on the animal page and add the assignment.

Collars and animals are listed in a table on their corresponding pages when you select them. At the end of each table row, you find the “Assign to” icon .

Click on it and select which collar you want to assign to which animal, and a time span in which you want that collar to be assigned to the animal.

Option 3: Go to the collar detail page or the Animal detail page and add the assignment by using the Deployment bar.

You can access the details of a collar or an animal by clicking on the corresponding entry in the table on the Collar page or the Animal page. At the bottom of the detail page, you will find the Deployment bar. Click on the “Assign” button at the right end of the Deployment bar and select which collar you want to assign to which animal, and a time span in which you want that collar to be assigned to the animal.

Collar Last Receptions

The values recorded at Last Reception provide information about the last time when data was received in the INVENTA database.

There are two ways to view the Last Reception.

Option 1: Using the Home Screen

The Last Reception of all registered collars will always be displayed in the left area of the Home Screen

Option 2: Using the table from the Collars page

The Last Reception can be viewed in the table containing the collar data. It can be found in the Collars page.

Create a new account

If you want to create a new account, first visit https://inventa.vectronic-wildlife.com/ and then click on “SIGN UP”.

In the “Create Account” dialog you enter the email address to which your INVENTA account should be associated and a new password which you should ideally only use to log in to INVENTA.

To be on the safe side you have to enter this password a second time.

After that, click on the SIGN UP button below.

Now you will receive an email in which you are requested to activate your account.

After clicking the “Activate Account” button, you will be automatically logged into the web browser with your new INVENTA account.

Create Collar Groups

To create collar groups please switch to the Collar page at first.

In the upper right corner, still above the table is the “ Manage groups” button.

Now you reach the groups menu.

The + on the right side is the “Add a new group” button.

When you click on it a dialog will open where you can enter a group name and a description.

Just tick the collars you want to add to the group.

Export positions and other data

Data can be exported from each of the following pages:

Events → Mortality Events
Events → Mortality Implant Events
Events → Proximity Events
Events → Separation Events
Events → Trap Event Events
Events → Vaginal Implant Events
Data → Positions

The export contains only the currently displayed data. The amount of data can be reduced by hiding the table columns or filtering. Data can be exported either in CSV or KML format.

The corresponding buttons are located above the table.

If you click on the export button a dialog appears:

Here you can specify the CSV separator and decide if the whole export should be contained in one single file or if you want to have a separate file for each collar/animal.

For the export of positions, you can also choose KML as format.

Forward ground station data to INVENTA

  • Make sure, that you have at least ADMIN permission for those collars you want to forward data to INVENTA and that you can use the account e-mail address as SMTP server in the following step. 

  • Configure a SMTP Server for outgoing emails in GPS PLUS X with the email address of your INVENTA account: 


  • After that, you can configure data forwarding for the collars of your own ground station, by configure Data Mailing, see picture below. 
    Use the following destination address: gdx-collector@vectronic-wildlife.com.  

Incoming data from your GPS PLUS X collectors are now forwarded to INVENTA. The maximum amount of uploaded data per collar is 200.000.

How to forward data to Movebank

Precondition: You need a Movebank account.

  • In INVENTA go to Preferences/Movebank
  • Enter the name of your Movebank account and ‘Apply’.

  • Go to collars page and enable the column ‘Movebank’ by changing the column filter in the table header
  • Activate forwarding of new data and/or upload all data for the devices you want
  • (You need at least ADMIN permisson for the device)


  • To add the collar feed to your Movebank study, please follow the instructions from Movebank.

How to manage user roles

Note: What is described here refers to Collars but can be applied to Animals in the same way.

Share single collars:
– Go to the COLLARS page
– Find the collar from the table you want to share with another user and click on it.
– At the user panel on the right side you can enter the email address and the role of the user who should have access to the collar.
– A click on the Share button finishes the process of sharing the collar.
(If the user to whom the rights have been granted is currently logged in to INVENTA, he may have to reload the page.)

Share collar groups:
– Go to the COLLARS page.
– Click on the Manage Groups button at the top right.
– Optional: If necessary create a group of collars first.
– At the user panel on the right side you can enter the email address and the role of the user who should have access to the collar.
– A click on the Share button finishes the process of sharing the collar group.
(If the user to whom the rights have been granted is currently logged in to INVENTA, he may have to reload the page.)

How to setup notifications

For all your devices with ADMIN or OWNER permission you can add Notification addresses to get alert and status messages of your devices via email and SMS.  

You will be notified at the following events: 

  • Mortality or low activity  
  • Mortality implant 
  • Separation mortality or no contact 
  • Vaginal implant expelled or no contact 
  • Virtual fence crossed 
  • Trap triggered 
  • Trap status (only Email) 

You can add a notification address in the collar details or directly in the table: 

      You can manage notifications for multiple collars.

      How to upload data from your GPS Plus X to INVENTA

      • Make sure, that you have at least ADMIN permission for those collars you want to upload data to INVENTA and that you can use the account e-mail address to send e-mails.


      • Export the data of a collar in your GPS PLUS X as GDX file.
      • Send the exported file via e-mail:

      Destination address: gdx-collector@vectronic-wildlife.com

      Subject: Data for Collar XXXXX (where XXXXX is the Collar ID)

      Attachment: GDX file export from GPS PLUS X with data of that collar. (ends with .gdx)


      In case you have the permission for that collar, the data in the GDX-file is filtered by duplicates and integrated into our databases. The maximum amount of uploaded data to INVENTA per collar is 200.000.


      Rename a collar

      First please switch to the Collar page.

      Now click on the row of the collar you want to rename to open its collar properties:

      Then click on the “Edit Collar” icon to open the corresponding dialog:

      Enter a new name and click Apply.

      View data in a table and filter them

      Data in table format can be viewed at the following sections:
      Events → Mortality
      Events → Mortality Implant
      Events → Proximity
      Events → Separation
      Events → Vaginal Implant
      Events → Trap Event
      Data → Positions

      If you switched to one of these pages, make sure you have selected a collar that collected some of this data you want to view. Collars can be selected at the left side:

      At the right you will find the filters. If you activate filters, you will get access to their properties.

      Once you have set the filters click on the button Apply to activate them:

      Below the table you can choose how many entries should be displayed on one page. Also you can switch between pages:

      View positions of your collars on a map

      INVENTA provides three options for viewing the positions of your animals on a map.

      Option 1: Use the Home Screen

      With this method you can check the latest position data of all your collars at once. To see more detailed position data please continue with option 2.

      In the right area of the Home Screen you will find a map that shows the positions of all your registered collars by default.

      To change the zoom factor, you can use the mouse wheel or the +/- buttons in the upper left corner of the map.

      On the right above the map, you will find the filter button. Here you can select either a number of recent positions or a specific time span in days, weeks, months or years. The initial values of these filters can be set in your preferences.

      If you move your mouse cursor over the -icon you can show or hide different view options. One of three map display types can be selected here. And you can decide whether many positions in a small space should be combined into a cluster and if tracks and/or track arrows should be displayed.

      Option 2: Use the maps page

      Just to the left of the map you can select the collars whose position should be displayed on the map. The search field allows you to show specific collars or in other words hide collars you do not want to view.

      To the right of the map are the filters. Here you can select either a number of recent positions or a specific time span in days, weeks, months or years.

      Option 3: Use the Collar properties

      First go to the collars page and then click on the table row with the collar, and open its Collar Properties.

      Then click on the map button in the upper right corner.

      Here the positions of the collars are displayed according to the filter.

      With the Inventa application you can view and download the data from animals, tracked by your VECTRONIC devices.

      Seamlessly integrated into the INVENTA webservice platform, the App allows access to the same data within your INVENTA account without the need for an internet connection.

      This includes:

      • Map locations and positions data from all you collars
      • GPS Positions, Mortality events, Mortality Implant events, Proximity events, Separation events, Trap events, and Vaginal Implant events
      • Collar groups, animals, animal groups, etc
      • Use of offline mobile device GPS to locate animals when cellular (GSM) coverage is not available

      All this data is displayed in tables and can be filtered. In addition to all this data being displayed in tables, the Position data is also shown on a map. This map supports multiple features, such as showing the device’s current position and different map layers (satellite, terrain, etc). All the data that is downloaded by the application is stored in a local database on the device. As a result, you can login and see already downloaded data even when your device does not have Internet access.

      p

      Good to know:

      To control how much Internet traffic and storage space the application consumes, you can change multiple settings. On the one hand, there is the data limit. The data limit determines how much data is downloaded and stored. On the other hand, there is the data refresh interval. This interval determines how often the application checks online for new data. The filters only apply to data which are downloaded to the smartphone database.

      INVENTA 2.25.0 Release Notes

      INVENTA 2.25.0 has been released on July 17, 2024. The update contains the following features and fixes: - added 2 new data tables       + Activities       + Virtual Fences - added recent hours filter - fixed adding users to animal groups - small UI improvements + bug...

      INVENTA 2.14.1 Release Notes

      INVENTA 2.14.1 has been released on May 14, 2024. The update contains the following features and fixes: - changed default table size from 15 to 100 - sorting applies for devices table exports - improved the collar selection + search - fixed last-x filter on dashboard...

      INVENTA 2.4.5 Release Notes

      INVENTA 2.4.5 has been released on Nov. 23, 2023. The update contains the following features and fixes: - improved map performance- positions are now centered on the map- added permission management to mobile view- fixed several small bugs

      Vectronic API update

      Dear Valued Customer,  If you do not use the Vectronic API, you are not affected by the update and can ignore this message. We will migrate the Vectronic API to a new improved database on 16th October 2023.  The API migration will change the ID of all data events...

      INVENTA 2.1.0 Release Notes

      INVENTA 2.1.0 has been released on Sep. 13, 2023. The update contains the following features and fixes: Split devices into collars and traps Improved mobile view Fixed several small bugs Improved several UI styles

      INVENTA 2.0.11 Release Notes

      INVENTA 2.0.11 has been released on Apr. 5, 2023. The update contains the following features and fixes: Big code migration for shared codebase for INVENTA Desktop Fixed collarkey import Fixed a bug on manage multi notifications Fixed deployment dates based on UTC...

      INVENTA App Update 1.5.3 (Android)

      The INVENTA app for android has been updated to version 1.5.3 on Mar. 9, 2023. The update contains the following features and fixes: Switched to new improved database architecture Some icons are dynamically shown, based on the value Added some new data fields Improved...

      INVENTA 2.0.7 Release Notes

      INVENTA 2.0.7 has been released on Feb. 9, 2023. The update contains the following features and fixes: Added notification addresses and users to the exported CSV file Added spinner to all events, positions, map, dashboard, collars, and animals pages. Added position...

      INVENTA 2.0.0 Release Notes

      INVENTA 2.0.0 has been released on Dec. 15, 2022. The update contains the following features and fixes: Switch INVENTA to our new improved database architecture  - New data is available in INVENTA after a few seconds  - Increased general service availability and...